


RAID PERC H965i, H755 Configuration on Dell Poweredge r760 / R660 server
OLEKSANDR SYZOVShare
RAID PERC H965i, H755 Configuration on Dell Poweredge r760 / R660 server
Безкоштовна Професійна Консультація з серверного обладнання.
Тел: +38 (067) 819-38-38 / E-mail: server@systemsolutions.com.ua
Конфигуратор Сервера DELL PowerEdge R760
Configuring RAID on your Dell PowerEdge R760 and also Dell PowerEdge R660 server with a PERC H965i or H755 controller typically involves using the Human Interface Infrastructure (HII) Configuration Utility, which you access during the server's boot process.
Here's a general guide on how to do it:
Important Considerations Before You Start:
- Data Loss: Creating a new virtual disk (RAID array) will delete all existing data on the physical disks you select for the array. Back up any critical data before proceeding.
- RAID Level: Understand the different RAID levels (e.g., RAID 0, RAID 1, RAID 5, RAID 6, RAID 10) and choose the one that best suits your needs for performance, redundancy, and storage capacity.
- Disk Requirements: Ensure you have the correct number and type of physical disks for your chosen RAID level.
- Firmware: It's always a good idea to ensure your PERC controller and server firmware are up to date for optimal performance and stability. You can find these on the Dell support website for your PowerEdge R760.
Steps to Configure RAID using the HII Configuration Utility:
- Boot the Server: Power on your Dell PowerEdge R760 server.
- Access System Setup: During the server's Power-On Self-Test (POST), look for prompts to enter "System Setup."
- Typically, you'll press F2 or F10 to enter the System Setup (which might lead you to the Lifecycle Controller, from where you can access System Setup).
- Navigate to Device Settings: Once in the System Setup, look for and select "Device Settings." This is where you'll find your RAID controller.
- Select Your PERC Controller: In the Device Settings menu, select your specific PERC controller (e.g., PERC H965i or PERC H755). This will open the PERC Configuration Utility.
- Go to Configuration Management: Within the PERC Configuration Utility, navigate to "Main Menu" and then "Configuration Management."
- Create Virtual Disk: Select the option "Create Virtual Disk."
- Choose RAID Level:
- Select the desired "RAID Level" from the available options (e.g., RAID 1, RAID 5, RAID 10).
- You may also need to select the "Physical Disk Form" (e.g., "Unconfigured Capacity").
- Select Physical Disks:
- Click on "Select Physical Disks."
- Choose the physical disks you want to include in your RAID array. You'll typically see options for "Media Type," "Interface Type," and "Sector Size."
- Confirm and Apply Changes.
- Configure Virtual Disk Parameters:
- You'll be prompted to configure parameters for your new virtual disk. This includes:
- Virtual Disk Name: Give your virtual disk a descriptive name.
- Virtual Disk Size: This will show the maximum available capacity.
- Strip Element Size: Select the strip element size (e.g., 64 KiB or 256 KiB).
- Read Cache Policy: (e.g., No Read-Ahead, Read-Ahead)
- Write Cache Policy: (e.g., Write-Through, Write-Back, Force Write-Back). Write-Back generally offers better performance but relies on the controller's cache.
- Disk Write Cache Policy: (Default, Enable, Disable)
- Default Initialization: Choose the initialization method (Fast, Full, or No).
- Fast Initialization: Initializes the first and last 8 MB of the virtual disk.
- Full Initialization: Initializes the entire virtual disk (takes longer).
- No Initialization: Skips initialization.
- Click "Create virtual disk."
- Confirmation: The utility will ask you to confirm that creating the virtual disk will delete existing data. Confirm to proceed.
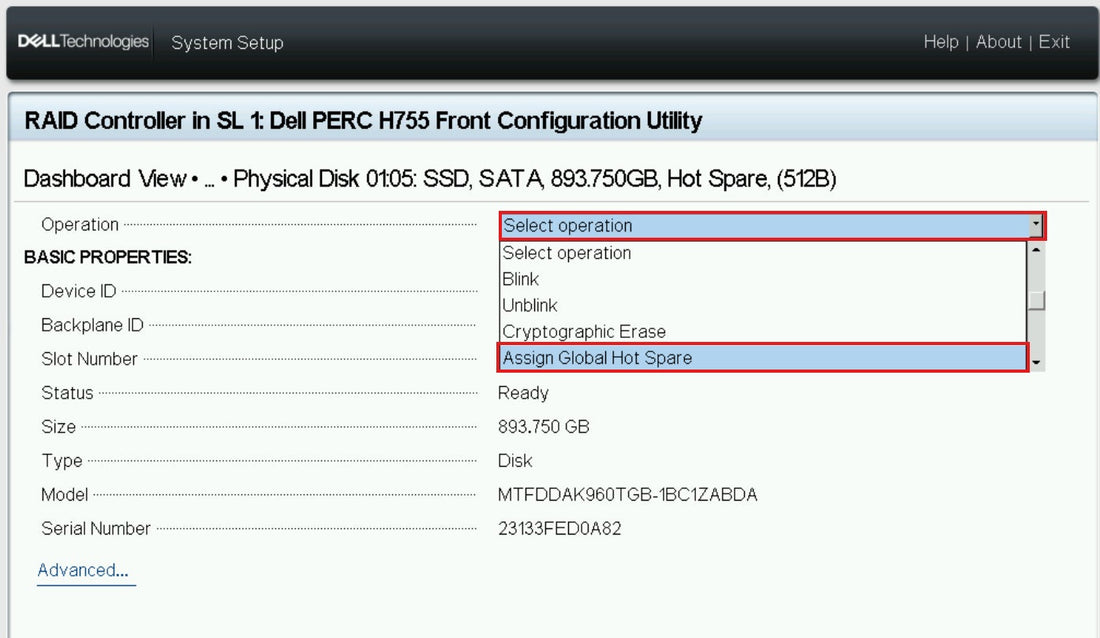
- Assign Hot Spare (Optional but Recommended):
- After creating the virtual disk, you might want to assign a hot spare. A hot spare is a dedicated physical disk that automatically replaces a failed drive in the RAID array, helping to maintain data redundancy.
- Go to "Physical Disk Management" or "Configure Hot-Spare Drives" (the exact wording might vary slightly).
- Select an unconfigured disk and choose to assign it as a Global Hot Spare (can be used for any array) or a Dedicated Hot Spare (assigned to a specific virtual disk).
- Exit and Reboot: Once you've configured your RAID array, exit the PERC Configuration Utility and then exit System Setup. The server will likely prompt you to reboot.
Additional Notes:
- Dell OpenManage Storage Management: For ongoing management and monitoring of your RAID configuration from within the operating system, you can install Dell OpenManage Storage Management (OMSM).
- PERC Command Line Interface (CLI): Advanced users may also configure RAID using the PERC CLI, but this is typically done through a command-line interface within the operating system or a specialized utility.
- Documentation: Always refer to the official Dell PowerEdge R760 documentation and the specific user guide for your PERC H965i or H755 controller for the most accurate and detailed instructions. You can find these on the Dell Support website by entering your server's service tag.
This outline should help you configure RAID on your Dell PowerEdge R760. Remember to proceed with caution and back up any important data.
Найкращі ціни на офіційні сервери DELL PowerEdge R760 в Україні.
Безкоштовна консультація по телефону +38 (067) 819 38 38
Доступні моделі серверів зі складу у Києві:
Сервер Dell PowerEdge R760 - Intel Xeon Silver 4510 2.4-4.1Ghz 12 Cores
Сервер Dell PowerEdge R760 - Intel Xeon Silver 4514Y 2.0-3.4Ghz 16 Cores
Сервер Dell PowerEdge R760 - Intel Xeon Gold 6526Y 2.8-3.9Ghz 16 Cores
Сервер Dell PowerEdge R760 - Intel Xeon Gold 5420+ 2.0-4.1Ghz 28 Cores